Understanding aperture, shutter speed, and ISO is essential for mastering photography. These three elements form the exposure triangle, controlling light and creating desired effects in images.
1.1. Understanding the Exposure Triangle
The exposure triangle consists of aperture, shutter speed, and ISO, which collectively control light exposure in photography. Aperture regulates the lens opening, shutter speed controls exposure duration, and ISO adjusts sensor sensitivity. Balancing these elements ensures optimal image brightness. A chart or guide can help photographers visualize how these settings interact. For example, lowering ISO and using a smaller aperture can compensate for bright lighting. Understanding this relationship is crucial for achieving desired effects, such as motion blur or depth of field, in various shooting conditions.
1.2. Importance of Aperture, Shutter Speed, and ISO in Photography
Aperture, shutter speed, and ISO are fundamental in photography for controlling light and creating visual effects. Aperture determines depth of field, isolating subjects or capturing landscapes sharply. Shutter speed freezes or blurs motion, adding dynamic effects. ISO adjusts sensor sensitivity, crucial for low-light conditions. Together, they enable photographers to achieve creative control over images. A chart or guide simplifies understanding their interactions, helping photographers make informed decisions for portraits, sports, or night photography, ensuring optimal results in various lighting scenarios.
Aperture Explained
Aperture is a fundamental element in photography, controlling the amount of light entering the lens. It works alongside shutter speed and ISO in the exposure triangle, enabling creative control for portraits, landscapes, and more.
2.1. Definition and Function of Aperture
Aperture refers to the size of the camera’s aperture, which is the opening that regulates light entry. It is measured in f-stops, such as f/2.8 or f/16. A smaller f-stop value means a larger aperture, allowing more light in, while a larger f-stop value means a smaller aperture, letting less light pass through. This adjustment is crucial for achieving the desired depth of field and exposure in various photography scenarios, making it a key component of the exposure triangle.
2.2. How Aperture Affects Depth of Field
Aperture significantly influences depth of field, which is the area in focus within an image. A large aperture (small f-stop, e.g., f/2.8) creates a shallow depth of field, blurring the background and emphasizing the subject. Conversely, a small aperture (large f-stop, e.g., f/16) results in a deep depth of field, keeping both foreground and background in focus. This control allows photographers to guide viewer attention and achieve artistic effects, making aperture a powerful tool for creative expression in various photography genres.
2.3. Common Aperture Values and Their Effects
Common aperture values range from f/1.4 to f/32. Wide apertures like f/1.4 or f/2.8 create a shallow depth of field, ideal for portraits. Medium apertures like f/5.6 or f/8 balance depth of field and light entry, suitable for everyday photography. Small apertures like f/11 or f/16 ensure more of the image is in focus, often used in landscapes or group photos. Understanding these values helps photographers select the right setting for their desired effect, enhancing creativity and technical precision in their work.
Shutter Speed Explained
Shutter speed controls the duration light enters the camera, affecting motion and blur. Faster speeds freeze action, while slower speeds create artistic blur, enhancing visual storytelling.
3.1. Definition and Role of Shutter Speed in Photography
Shutter speed refers to the length of time the camera’s shutter remains open, measured in seconds or fractions of a second. It plays a crucial role in capturing images by controlling the amount of light that reaches the sensor. Faster shutter speeds are ideal for freezing fast-moving subjects, while slower speeds create motion blur, adding artistic effects to photos; Understanding shutter speed is vital for achieving desired visual outcomes in various photography scenarios, from sports to low-light conditions. Proper use enhances image quality and creative expression.
3.2. How Shutter Speed Affects Motion and Blur
Shutter speed significantly influences how motion is captured in photographs. Faster speeds, like 1/500th of a second, freeze action, making moving subjects appear sharp. Slower speeds, such as 1 second, create motion blur, conveying movement and adding artistic effects. This blur can emphasize dynamic elements like flowing water or racing vehicles. Conversely, too slow a speed can result in unwanted blur, especially in handheld shots. Balancing shutter speed with aperture and ISO is key to achieving the desired visual impact in various photography genres, from sports to landscape and creative imagery.
3.3. Common Shutter Speed Values and Their Applications
Common shutter speeds range from 1/8000th of a second to 30 seconds. Fast speeds (1/500th–1/8000th) freeze motion, ideal for sports or wildlife. Medium speeds (1/60th–1/125th) create slight blur, often used for creative effects like flowing water. Slow speeds (1–30 seconds) emphasize motion blur, perfect for light trails or artistic imagery. Each speed offers unique effects, allowing photographers to capture dynamic or serene scenes based on their creative vision.
ISO Explained
ISO controls the camera’s sensitivity to light, balancing exposure with aperture and shutter speed. Lower ISOs (100-400) suit bright light, while higher ISOs (6400-51200) are for low-light conditions, though they may introduce noise.
4.1. Definition and Function of ISO
ISO (International Organization for Standardization) in photography refers to the camera sensor’s sensitivity to light. A lower ISO value (e.g., ISO 100) means the sensor is less sensitive, suitable for bright lighting. Higher ISO values (e.g., ISO 6400) increase sensitivity, ideal for low-light conditions. However, higher ISOs can introduce digital noise, affecting image quality. ISO works alongside aperture and shutter speed to achieve proper exposure, allowing photographers to capture images in various lighting environments effectively.
4.2. How ISO Affects Image Quality and Noise
ISO directly impacts image quality by introducing digital noise, particularly in low-light conditions. Lower ISO settings (e.g., ISO 100-400) minimize noise, resulting in sharper, cleaner images. Higher ISOs (e.g., ISO 6400-25600) increase sensitivity but may cause grain or pixelation, degrading image clarity. This trade-off requires balancing exposure needs with noise reduction. Proper techniques, such as using a tripod or noise reduction software, can help mitigate noise while maintaining optimal image quality in challenging lighting scenarios.
4.3. Best Practices for Using ISO in Different Lighting Conditions
In bright lighting, use the lowest ISO (e.g., ISO 100-400) to minimize noise. In low light, increase ISO cautiously to avoid excessive grain. For indoor photography, ISO 800-1600 often suffices, while nighttime or astrophotography may require higher settings (3200-51200). Always prioritize the lowest necessary ISO to maintain image quality. Pairing higher ISOs with wide apertures and fast shutter speeds can help optimize results. Adjustments should be made incrementally, monitoring the histogram to ensure proper exposure without overcompensating.

Aperture, Shutter Speed, and ISO Chart PDF
A comprehensive PDF chart simplifies understanding of aperture, shutter speed, and ISO settings, helping photographers quickly reference ideal combinations for various lighting conditions and creative effects.
5.1. Benefits of Using a Chart for Understanding Exposure Settings
A chart simplifies the complex relationship between aperture, shutter speed, and ISO, making it easier to visualize how adjustments impact exposure. It serves as a quick reference guide, helping photographers make informed decisions under various lighting conditions. By providing a visual breakdown, the chart reduces trial and error, accelerates the learning process for newcomers, and acts as a reliable tool for experienced photographers to verify settings. This visual aid enhances workflow efficiency and ensures consistent, high-quality results in diverse photographic scenarios.
5.2. How to Read and Interpret the Chart
To interpret the chart, start by identifying the axes, typically representing aperture, shutter speed, and ISO. Labeled values and color-coded sections simplify understanding. Each element shows how adjustments impact exposure. For example, a higher aperture (smaller opening) increases depth of field, while faster shutter speeds freeze motion. ISO sensitivity affects noise levels. By cross-referencing these settings, photographers can balance lighting conditions with creative goals. This visual tool helps predict outcomes, enabling precise control over image capture and ensuring optimal results in various scenarios.
5.3. Downloading and Printing the Chart for Reference
Downloading the aperture, shutter speed, and ISO chart as a PDF ensures easy access. Print it on high-quality paper for clarity. Adjust print settings to fit the page size, and consider laminating it for durability. Keep it handy in your camera bag or studio for quick reference. This physical guide helps photographers make informed decisions without relying on digital devices, ensuring consistent and precise control over exposure settings in any shooting environment.
Relationship Between Aperture, Shutter Speed, and ISO
Aperture, shutter speed, and ISO work together to control light and exposure. Adjusting one affects the others, requiring balance for optimal image results and desired effects.
6.1. How Aperture, Shutter Speed, and ISO Work Together
Aperture, shutter speed, and ISO harmonize to regulate light entry and exposure. Aperture controls light quantity, shutter speed manages duration, and ISO adjusts sensor sensitivity. Together, they balance light intake, ensuring proper exposure. This synergy allows photographers to achieve desired effects, like depth of field or motion blur, by adjusting these elements in unison. Understanding their interplay is crucial for capturing images with precise lighting and artistic intent.
6.2. Balancing the Exposure Triangle for Optimal Results
Balancing aperture, shutter speed, and ISO is key to achieving optimal exposure. Adjusting one element requires compensating with the others to maintain desired light levels. For instance, a smaller aperture (higher f-stop) increases depth of field but may necessitate a slower shutter speed or higher ISO for proper exposure. This delicate balance ensures images are neither under nor overexposed, while also meeting artistic goals like motion blur or sharpness. Mastering this balance enhances creativity and consistency in photography.

Practical Examples and Applications
Practical examples using the aperture, shutter speed, and ISO chart help photographers master techniques like portraits, landscapes, and low-light photography, ensuring optimal results in various scenarios.
7.1. Using the Chart for Portrait Photography
The chart is invaluable for portrait photography, helping photographers achieve desired effects. By referring to the chart, one can select optimal aperture settings to create a shallow depth of field, ensuring the subject stands out against a blurred background. For instance, an aperture of f/2.8 is often recommended for portraits to produce a pleasing bokeh effect. Shutter speed can be adjusted based on the subject’s movement; a faster shutter speed like 1/125s or higher is ideal for capturing sharp images of moving subjects, while slower speeds can introduce creative blur. ISO settings should be kept low, typically between 100 and 400, to minimize noise, but can be increased in low-light conditions. The chart provides guidelines for balancing these elements, ensuring properly exposed portraits with artistic intent. By following the chart’s recommendations, photographers can confidently experiment with different lighting conditions and creative styles, knowing they have a solid foundation for their settings. This approach allows for consistent results and fosters creativity in capturing stunning portraits.
7.2. Using the Chart for Landscape Photography
The chart is a powerful tool for landscape photography, aiding in capturing vast, detailed scenes. A small aperture like f/8 or f/11 ensures a large depth of field, keeping the entire landscape sharp. Shutter speed can be adjusted to freeze or blur elements like water or clouds, with slower speeds creating artistic motion. ISO is typically kept low (100-400) to minimize noise, but higher settings may be necessary in low light. The chart helps balance these elements for optimal exposure, enabling photographers to achieve crisp, well-exposed landscape images with ease and consistency.
7.3. Using the Chart for Low-Light and Night Photography
The chart is invaluable for low-light and night photography, helping photographers achieve well-exposed images in challenging conditions. A wide aperture (like f/2.8) allows more light, while slower shutter speeds (e.g., 30 seconds) capture starry skies or create light trails. ISO may need to be higher (800-6400) to brighten the scene, but beware of noise. The chart guides balancing these settings to minimize noise and ensure sharpness, making it easier to experiment with creative effects like star trails or cityscapes at night.

Advanced Techniques for Mastering Aperture, Shutter Speed, and ISO
Explore advanced techniques like bracketing, HDR, and manual mode to refine your photography skills. Use ND filters for better control over aperture and shutter speed in bright light.
8.1. Using Neutral Density (ND) Filters with Aperture and Shutter Speed
Neutral Density (ND) filters are powerful tools for controlling light; By reducing the amount of light entering the lens, they allow wider apertures or slower shutter speeds in bright conditions. This is particularly useful for achieving a shallower depth of field or creating motion blur, even in daylight. ND filters come in varying densities, enabling photographers to fine-tune their exposure without altering the ISO. They are indispensable for balancing creative visions with technical constraints, ensuring optimal results in challenging lighting scenarios.
8.2. Bracketing and HDR Techniques for Managing Exposure
Bracketing involves capturing multiple shots at different exposures to merge later, ensuring detail in both highlights and shadows. HDR (High Dynamic Range) combines these images for a balanced result. This technique is ideal for high-contrast scenes, like landscapes with bright skies and dark foregrounds. By using bracketing, photographers can maintain control over aperture, shutter speed, and ISO, optimizing each frame before merging. This method enhances dynamic range without relying solely on post-processing, offering a non-destructive approach to achieving natural-looking images with rich detail across the entire tonal spectrum.
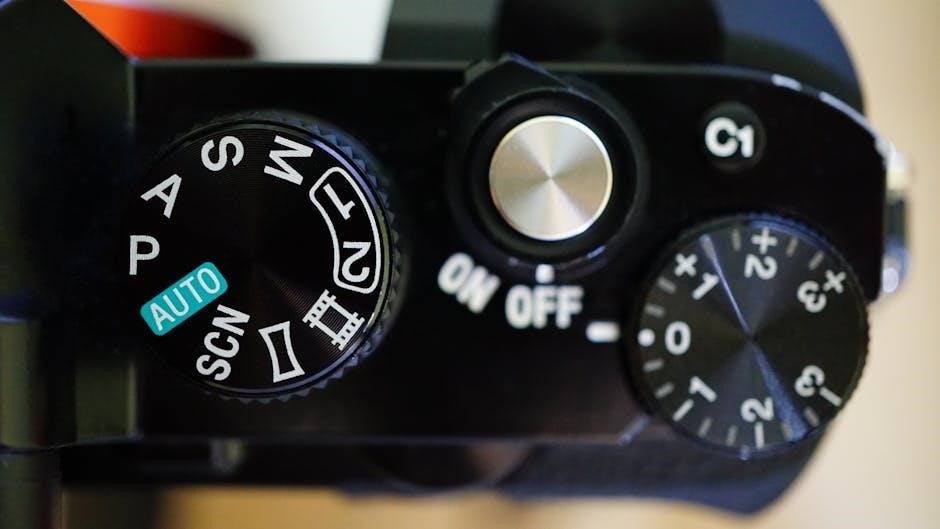
8.3. Manual Mode Shooting: A Comprehensive Guide
Manual mode offers full control over aperture, shutter speed, and ISO, allowing photographers to tailor settings to their creative vision. By adjusting these elements individually, one can achieve precise control over exposure, depth of field, and motion effects. This mode is particularly useful in challenging lighting conditions or for specific artistic effects. Using a aperture, shutter speed, and ISO chart PDF can help photographers plan and execute manual shots more effectively, ensuring optimal results in various scenarios, from portraits to landscapes and low-light photography.
Common Mistakes to Avoid
- Overlooking ISO’s impact on noise in low-light conditions.
- Using incorrect aperture for desired depth of field.
- Selecting wrong shutter speed for motion effects.
9.1. Overlooking the Impact of ISO on Image Quality
Many photographers underestimate how ISO affects image quality. High ISO settings can introduce noise, especially in low-light conditions, leading to grainy or pixelated photos. Using the aperture, shutter speed, and ISO chart helps identify optimal ISO levels for different lighting scenarios, ensuring minimal noise while maintaining proper exposure. This prevents overly grainy images and preserves sharpness, especially when shooting in dim environments without additional lighting. By referencing the chart, photographers can balance ISO with other settings for cleaner, professional results.
9.2. Incorrect Aperture Settings for Desired Depth of Field
Incorrect aperture settings can ruin the desired depth of field in photos. Using too small an aperture (high f-stop) may result in a deeper focus than intended, while too large an aperture (low f-stop) may blur parts of the image that should be sharp. Referencing an aperture, shutter speed, and ISO chart helps photographers select the right aperture for their scene, ensuring proper focus and background blur. This avoids mistakes like over-sharpening or under-sharpening, leading to more visually appealing and professional-looking images.
9.3. Using the Wrong Shutter Speed for Motion and Blur Effects
Using the wrong shutter speed can lead to unwanted motion blur or overly sharp images. Fast shutter speeds freeze motion, while slow speeds create blur. For dynamic effects, photographers must balance these settings. Incorrect shutter speeds can ruin shots like star trails or action photography. Referencing a chart helps determine the ideal shutter speed for desired effects, ensuring images capture motion or sharpness as intended. Avoiding this mistake requires understanding how shutter speed interacts with aperture and ISO to achieve the perfect exposure and visual impact.
Troubleshooting Exposure Issues
Check exposure settings, use histograms, and adjust aperture, shutter speed, or ISO to fix under or overexposed images for optimal results, referencing a chart for guidance.
10.1. Fixing Underexposed and Overexposed Photos
Correcting underexposed images involves increasing exposure by adjusting aperture to a lower f-stop, slowing shutter speed, or raising ISO. For overexposed photos, do the opposite: higher f-stop, faster shutter, or lower ISO. Using a reference chart helps balance these settings effectively, ensuring proper lighting and detail retention without overcompensating, which can introduce noise or loss of dynamic range in the final image.
10.2. Adjusting Aperture, Shutter Speed, and ISO for Correct Exposure
To achieve proper exposure, photographers must balance the aperture, shutter speed, and ISO. Start by selecting an aperture that suits your depth of field, then adjust shutter speed to freeze or blur motion. Finally, set ISO based on lighting conditions. A chart can guide these adjustments, ensuring optimal results without trial and error; For example, if the image is too dark, open the aperture, slow the shutter, or increase ISO. Conversely, for brightness, close the aperture, speed up the shutter, or lower ISO.
Mastering aperture, shutter speed, and ISO is key to photography. Use the exposure triangle chart to balance settings for stunning results and keep practicing to refine your skills.
11.1. Summary of Key Concepts
11.2. Encouragement to Practice and Experiment
Consistent practice and experimentation are vital to mastering aperture, shutter speed, and ISO. Start with simple exercises, gradually exploring complex techniques. Use the aperture, shutter speed, and ISO chart PDF as a guide to visualize their interactions. Shoot in various lighting conditions to understand how each setting impacts your images. Embrace trial and error—every photo is a learning opportunity. Share your work for feedback and stay inspired by others’ creative approaches. With dedication, you’ll develop a keen eye and confidence in your photography skills.